
This tutorial cam from the following website: http://www.webclass.ru/tut.php?tut=34
- After starting of with Fireworks create a new file with dimension W:
125 X H: 80 with background transparent and
resolution 72, save it & keep saving if your computer hangs
you will lose all your work
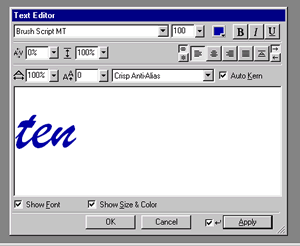
- Now lets type some text, select the text tool, click on the
icon with the letter 'A' on it on the toolbar, click on the
canvas, you will get a text editor, set size to 100 and type
some text, I am using the word 'ten' to keep the animation short. Make
sure the you choose a font that continues between each letter like the
one I am using - Bush Script MT.
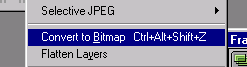
- The text is in vector format we need to rasterize (convert to
bitmap) as we will be using the earaser tool on it, press ctrl alt
shift Z or convert it to bitmap or by using the modify menu > convert
to bitmap as shown below.
- Now after converting the text to bitmap we need to use the frames pallete, press shift F2 or go to the window menu > frames.
Now here is from where the real thing starts i.e: animation, now attentively follow the steps from here.
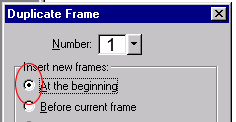
- Now go to the frames pallete, click on the small black triangle
facing to the right to bring the out the frame pallete fly-out and
select Duplicate Frame.

- After doing this you will get a pop query asking how many frames to
add leave it to one and select the radio button namely - At
the beginning.
- Now go to the frame you just created i.e: frame number 1 it
will always be frame number 1 as u will be duplicating the last layer
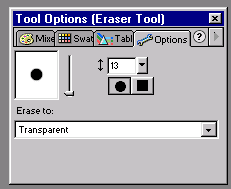
created and put it in the beginning. Select the eraser tool from the
tool bar or by pressing 'E' on your keyboard. Now what you have
to do is start erasing from the end of the word 'ten' little by little
and at the same time move on to the earlier frame one by one, select a
round brush with size 13, to do this double click on the
eraser tool icon on the toolbar to open the eraser options
pallete, make sure 'erase to transparent' is selected in the drop down
selection.
- Now erase a little part of the letter 'N' in the sequence shown
below at the same time keep adjusting the size of the eraser (double
click on the eraser tool icon on the toolbox) as per the
curves.
Frame 28 
Frame 27
Frame 26
Frame 25
Frame 24
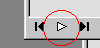
- Now save your animation, to test the animation click on the small
white play button at the bottom of the document window. Your
aniamtion should start playing in the document window itself.
- Now the final part i.e rendering your animation or exporting it. Go
to the File menu selct Export Preview, You will get a
export preview window in the Format selection choose Animated GIF,
If you want to control the speed of ur animation go to the Animation
tab select all the frames from top to bottom by pressing shift
and simultaneously clicking on the top and the bottom frames and
putting a number in the input box with a small clock above it shown
below.

- Click on Export, save ur GIF animation wherever u want
to on your Hard drive or your Floppy and..............VOILA your pen
writing animation is ready. Similarly before you save your animation
you can save it in SWF (flash) format just change the
file type in the 'Save As' window to Macromedia Flas SWF. It
should look something like shown below